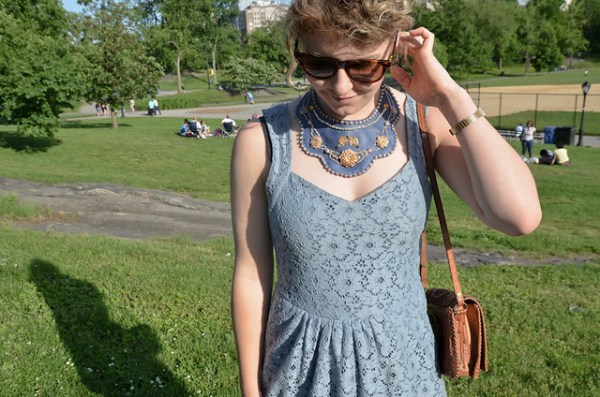
Over the past year I’ve been really into making different kinds of jewelry– especially detailed statement necklaces. Maybe it’s my lack of space living in a NYC apartment, but I’ve gotten quite a kick out of making detailed accessories while watching a show or sitting in the park. Recently Martha Stewart Jewelry came out with this awesome line of jewelry-making supplies– and it’s not just the buy-and-assemble jewelry lines that are so common in the craft shops. With the Martha Stewart line, you actually paint resin, create the cabochons from clay, and assemble the rhinestones in settings. It’s really, really neat and I’m impressed.

Just some of the items in the new line. Things like glass beads, pearl beads, cabochons, faceted gems, colored enamels, epoxy clays, decorative molds, findings and tools… Some fun stuff.
For my necklace, I used:
-The epoxy clay
-A few of the rhinestones and put them in settings
-The jewelry paint and glaze (and the glazing brush)
-A bit of rhinestone chain
-Leather scraps
-A couple of litte vintage notions that I had around

I started by mixing the epoxy clay and placing it in the mum cabochon. The cool thing about the epoxy clay is that it is stronger than regular polymer clay so you can turn it into charms!

To get the cabochon to be smooth on the back, I found that it was helpful to dab a little bit of olive oil on my fingers and then smooth everything on the mold. Then you let it dry for a few hours and pop them out!

After the cabochons dried completely, I painted them with the jewelry glaze. I also glazed one of the rhinestones after I put them in settings. Then I glued it in the center of the mum cabochon with some of the Martha Stewart jewelry glue.

To make the base of the necklace, I took some leather and cut it in the shape I wanted. (I actually got this leather on Ebay as part of a lot of upholstery scraps. That’s why there is a little line of stitching on the left side so that I could make the shape that I wanted.)

Then I glued the mum cabochons onto the leather with the jewelry glue and stitched some rhinestone chain onto the outside of the leather edges.

I added some of the Martha Stewart pearls and rhinestones with more rhinestone chain and that’s it!

I actually finished the necklace this weekend when I was sitting in Central Park with some friends. 🙂

Memorial Day in the park. <3 
And a final closeup of the mum cabochon.
Be sure to check out the other projects that you can make using the line of Martha Stewart Jewelry! (By the way, the entire line is available at all Michael’s stores.) 🙂
A huge thanks to Plaid for providing me with the materials for this project! Follow Plaid on Facebook, Twitter, and Pinterest.
Disclosure: This was a sponsored post via The Blueprint Social, which occasionally provides wonderful opportunities like this one to try new crafty products and share them here. The project idea and opinions are completely my own. <3


What a stunning piece!! I love how you used the cabochons. Gorgeous!
Wow. Truly a statement piece! I love this brave direction you took with your materials.
Beautiful
Such a fun necklace! I really love the olive oil tip. Need to try that . . .
Love the bib collar style and the tutorial!
Such a beautiful DIY statement necklace I must say. Those colorful beads are enhancing the beauty of whole necklace.
Being a jewelry love, I also love do experiments with beads and wires.
Though, I often prefer to wear Kilkenny olra kiely
accessories, but sometime I also try some funky and colorful
statement jewelry. They add charm and glory to the personality of wearer.